Garden Modifications
#web #diy #software #webdev #vibecoding
This site uses the Obsidian Digital Garden plugin to publish to the web. Here are my notes on the changes I've made, which are in my public repo.
I have a pretty basic knowledge of web development so a lot of this has been an experiment in Vibecoding.
Local Development
Clone your repo and make sure you npm installed. For VS Code, I added the Nunjucks Template extension for syntax highlighting.
From within the project's folder: npm run build will generate the static site with Eleventy and npx serve dist will start a local server.
Fixing RSS
One of the first things I noticed was that the RSS feed is broken. This open issue on Github describes the fix: edit /src/site/feed.njk and add another / escape to the end of each link tag on lines 10, 11, 26.
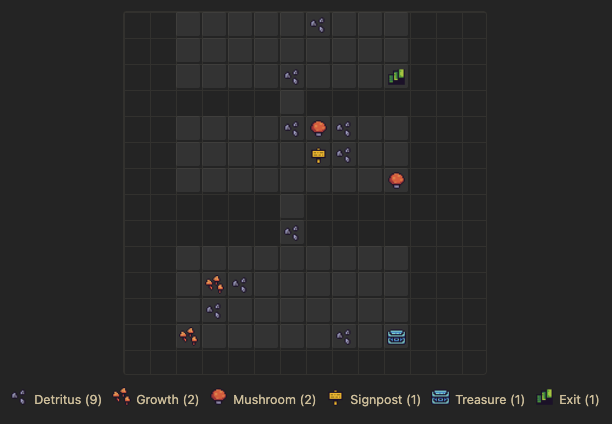
Hermitage's Forest
The author of the plugin has a pretty amazing "forest" visualization on their site. I immediately thought that if I had a similar grid, I could generate a dungeon map.
I first copied their code into my template. You need:
- the functions to generate the forest from userUtils.js
- the relevant custom css
- the template that displays the visualization
- the icon images
Once I had that working, I began using a coding agent to describe the changes I wanted. The forest has a CSS skew to achieve the isometric view, and the icons are portrait format so that they overlap, giving it depth and a sense of being overgrown.
I first removed the skew and changed the visualization so it generated a simple table of squares. Then I added square icons from this Zelda-style tileset.
I did some research on methods to randomly generate dungeon maps and the answer was binary space partitioning, a common algorithm used in rogue-likes. This is the type of thing I would not be able to code on my own, but if you have enough understanding of the problem a coding agent can stitch together the pieces. Modify this function in this file to use this algorithm to return a table... After throwing some vibe code at it and tweaking the styles and metaphors, I arrived at the first version of the dungeon:
SimpleLightbox
I've used this library in projects before because as the name suggests, it is very simple.
- Import the JS and CSS file into your template
- For every image you want to have the lightbox function, it needs to have a link to the image source and a lightbox class assigned to it. ex:
<a href=highres.jpeg class=lightbox><img src=responsive.jpeg></a> - You must initialize the lightbox to look for the images with that class. ex:
<script>var lightbox = new SimpleLightbox('a.lightbox', {})</script>
One problem I found with this is that SimpleLightbox does not support modern <picture> elements which is what the DG plugin uses to serve responsive images. I also wanted it to apply to my whole site without having to do this on every page manually. So I had an agent write a script that adds the class to all images (excluding my dungeon map) and if available, sets the image's source to a more reasonable sized one from the picture element. The script is here.
Visitor Counter
I got this idea from Paolo Gabriel, who used the excellent visit-counter project to accomplish this. I put a simple script in my template's footer.
<hr><center>
    <small>Visits: <span id="visit-counter"><code>  </code></span></small>
</center>
<script>
// Get the current page URL (host + pathname) for consistent counting
const currentUrl = window.location.host + window.location.pathname;
const encodedUrl = encodeURIComponent(currentUrl);

fetch(`https://visit-counter.vercel.app/counter?page=${encodedUrl}`)
  .then(response => response.text())
  .then(count => {
    console.log('Visit count:', count);
    // Optional: Display the count on your page
    const counterElement = document.getElementById('visit-counter');
    if (counterElement) {
      counterElement.innerHTML = `<code> ${count} </code>`;
    }
  })
  .catch(error => {
    console.error('Error fetching visit count:', error);
  });
  </script>